ReaperQuickstartFrench
From CockosWiki
(→Enregistrement) |
(→Importing Existing Tracks) |
||
| Line 31: | Line 31: | ||
[[Image:Stop.png]] | [[Image:Stop.png]] | ||
| - | === | + | === Importer des pistes existantes === |
You can add existing sound files to your REAPER project by: | You can add existing sound files to your REAPER project by: | ||
# Clicking and dragging them in. REAPER will automatically add tracks to accomodate them. | # Clicking and dragging them in. REAPER will automatically add tracks to accomodate them. | ||
Revision as of 06:41, 19 March 2010
Contents |
Vite, je veux commencer !
Prêt à faire le pas et à commencer à faire de la musique ? Les informations figurant sur cette page vont vous faire avancer à grands pas. Une bonne manière d'apprendre à utiliser REAPER rapidement consiste à lire la section Keyboard de la boîte de dialogue Preferences (Ctrl-P). La lecture de cette section vous donnera un bon aperçu de la flexibilité et de la puissance de REAPER. Vous ne trouvez pas ce que vous cherchez dans REAPER ? Essayez le Clic droit sur n'importe quoi ! Vous serez surpris de la puissance cachée sous la surface !
Premiers pas
Les débutants en enregistrement audio devraient visiter en premier lieu la Foire aux questions des débutants !
La première fois que vous démarrez REAPER, le projet de démo Brad Sucks est chargé automatiquement. Vous pouvez alors appuyez sur le bouton Play dans la barre de transport et expérimenter pour apprendre les bases du fonctionnement de REAPER. Si vous avez besoin par la suite d'ouvrir à nouveau le projet Brad Sucks, il se situe en principe dans le doissier "C:\Program files\REAPER\BradSucks_MakingMeNervous".
Interfaces audio
Une des premières choses que vous voudrez faire avec REAPER sera de le configurer pour qu'il fonctionne avec votre (vos) carte(s)-son. Ouvrez la fenêtre des préférences (Ctrl-P), et allez dans la section Audio > Device. Choisissez le genre de carte-son que vous utilise dans le menu déroulant. La plupart des cartes de gase utilisent le système WDM. Les cartes plus professionnelles utilisent souvent le système ASIO. Lisez le manuel de votre carte-son pour plus de précisions. Il existe un bon driver ASIO qui fonctionne avec tous les systèmes de base. Il s'appelle ASIO4ALL. Il est téléchargeable gratuitement ici : [1]
Une fois que vous avez sélectionné le genre de carte que vous utilisez, ouvrez le menu déroulant Input Device et choisissez la carte elle-même. N'oubliez pas de choisir le Sample format (profondeur de bit) que vous désirez utiliser ainsi que le nombre d'entrées/sorties supporté par votre carte et le Sample Rate que vous préférez. Les cartes basiques sont limitées à 16 bits. Les cartes plus puissantes supportent souvent 16 et 24 bits.
Interfaces MIDI
Si votre carte-son supporte le MIDI, elle sera listée sur la page MIDI Devices de la boîte de dialogue Preferences. Choisissez le(s) interface(s) MIDI que vous voudriez utiliser, et faites un clic droit pour les activer.
Enregistrement
Pour enregistrer une nouvelle piste :
- Créez un nouveau projet REAPER
- Ajoutez une piste vide (Ctrl-T)
- Armez la piste pour l'enregistrement (cliquez sur le bouton Record/Arm de la piste)
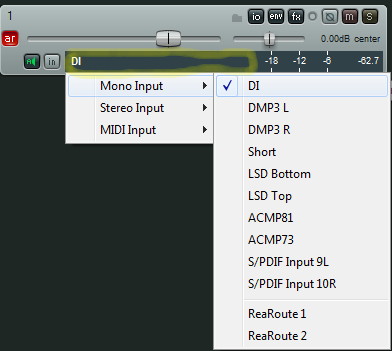
- Choisissez l'entrée source en cliquant sur le vu-mètre de la piste comme sur l'image ci-dessous.
- Cliquez sur le bouton d'enregistrement sur la barre de transport ou appuyez sur Ctrl-R.
- Appuyez sur le bouton Stop pour stopper l'enregistrement.
Importer des pistes existantes
You can add existing sound files to your REAPER project by:
- Clicking and dragging them in. REAPER will automatically add tracks to accomodate them.
- Inserting them using the 'Insert' menu item. Note the media item under the Insert menu is for supported sound formats and for video media as well.
Inserting and using a VSTi
Using VSTi's is simple in REAPER.
Setting VSTi preferences
- Check this page: Preferences_Plugins_VST There may be some options that pertain to you and your setup. Usually one that comes to mind are the "get plugin names" scanning options. If you have problems scanning VSTi's, disable the full name scanning REAPER does by default and see if that helps it.
Set your VST path here:
Scan for your vsti's using this button:
Inserting the VSTi into your project
There are a few ways to do this; I will show the easiest and most straightforward way for this quickstart.
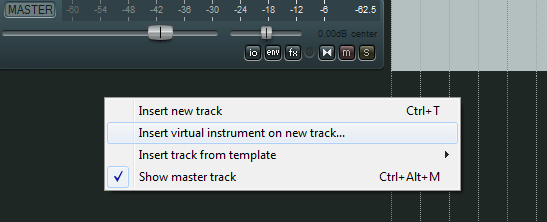
- Hover over an empty area in the Track Control Panel and right click, select "Insert Virtual Instrument on new Track"
- After you select it, select your VSTi of choice from the fx browser.
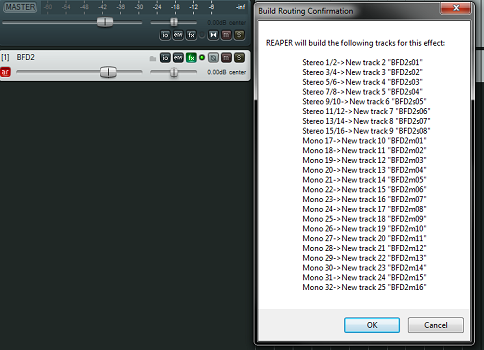
- One selected, if your VSTi supports multiple outputs, it will prompt you to automatically create routing and tracks for those outputs. If you want this, click "ok" - if not, and for the sake of simplicity for this quick start, click "cancel".
At this point, all MIDI channels will be selected for input so you can start playing right away, the track will be armed and ready for recording.
- For more information on the various options of actually monitoring and recording your VSTi, go here: Recording_MIDI
Mixing
REAPER offers Track Mixers and a Main Mixer. Use either, or both, to set volume & pan, select mute & solo, and to add effects to your tracks. REAPER comes with a large assortment of built-in, high-quality effects. Add them by clicking the FX button on the track.
In REAPER, groups are called Folders. Use Folders to apply volume, pan, and effects to a group of tracks. To create a Folder:
- Place the tracks you want to combine together in the Track Control Panel
- Add a blank track above them (Ctrl-T). This will be the Folder track.
- Click the Folder icon on the Folder track. The icon will change, and all tracks below the Folder track will become part of that Folder.
- Click the Folder icon on the last track you want included in the Folder. The icon will change, and the Folder is ready to go.
Rendering
When your mix is finished, it's time to combine your individual tracks into a single, stereo file. Rendering is done by clicking File > Render. Reaper supports WAV, Ogg, AIFF, and other audio formats.
- Mp3 is supported, if you follow the instructions here: How do i render to MP3?
If you plan to burn your new song to CD, select "Audio CD Image (CUE/BIN)" as the output format and check "Burn CD Image after render".
Tutorials
go here: ReaperTutorials for alot of helpful tutorials about REAPER :)


